Feature Comparision: ChargeBee Vs. Stripe Billing - Getting Started
A feature comparision between ChargeBee and Stripe Billing on the getting started process
Written by Iain Cambridge on September 14, 2023
Feature Comparision: ChargeBee Vs. Stripe Billing - Getting Started
Here we'll go over a comparision of the onboarding process for subscriptions and billing systems ChargeBee and Stripe Billing. Here we'll talk about the process from going to the landing page to going through the onboarding process for each system.
ChargeBee
When you go to the ChargeBee website the main thing it tries to do is to get you to book a demo to get you into the sales funnel. However, it is entirely possible to sign up for a free trial and even choose a paid plan without having to get on a call. You do this by either clicking “sign up for free” on the home page or clicking “sign up for free” on the pricing page under the starter column.
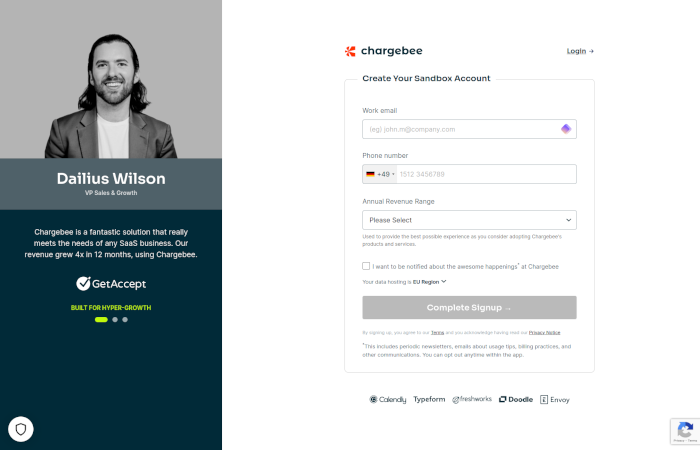
During the signup form process, you’re asked for 3 bits of information: email, phone number, and revenue. There is also a sort of hidden option where you can choose in which region your data is stored. This is important for many companies since they need to follow data privacy laws and that can demand your data is stored in certain areas.
Once you submit that you get told to check your email, I think they actually do some background logic to find out who your email provider is. I used a custom domain with Google Suite and it provided me a link to go back to Google Mail.
Once you confirm your email you then get to choose the name for your subdomain on Chargebee, the name of your account, and set your password. There is then some onboarding data collection such as finding out your goal and then they try to book an onboarding call. I didn’t do the onboarding call so I can’t say anything about it. But I can say that the calendar that was meant to load didn’t. I assume it got blocked by adblockers.
It sets up some sample data so you’re able to start playing around within the test account.
The first setup widget you have is to create a test plan with a price and then simulate a purchase using a modal to show you how a customer would be buying. I found this to be quite informative and reassuring as you find out quickly how the customer would go through the purchasing process and you see it for yourself.
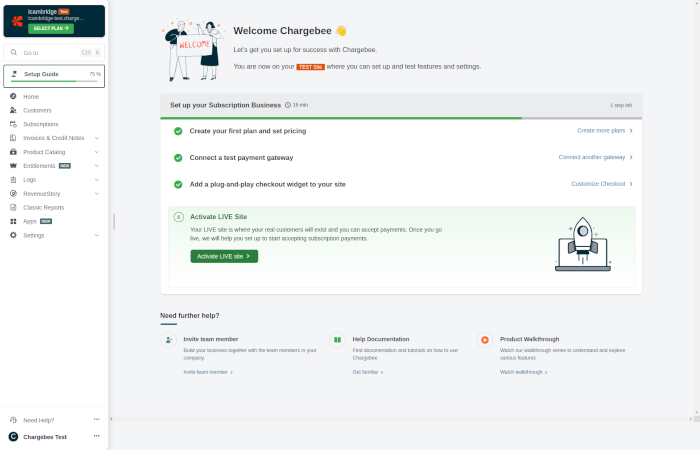
There is then a setup guide in the sidebar, I found this rather hidden and not really something that jumped out at me. So I was originally left searching around the settings to try and figure stuff out before I spotted it. Once I spotted it and clicked on it, it was great and very useful.
During this setup stage, you create a plan and set the pricing. This is a quick and easy process with a slick UI. The plan creation and pricing will be gone over in finer detail later.
Then choose your payment gateway allowing you to choose between multiple. This means that you also have to go through another setup process to get started with ChargeBee. Connecting it to Stripe was as easy as using Stripe Connect clicking a button and logging into Stripe.
The options for integrating it start off with payment links that are defined and you just add a link. The next option suggested is using the javascript library where you add the JS library by copying the HTML given and pasting it into your HTML code. And then copying a buy now HTML to add a buy now link, as well as, a portal link. Lastly, it provides a link to API integrations.
Approximately 30 minutes after sign-up I got a phone call from Chargebee to find out my requirements. So they’re very hands-on with the signup process.
Overall, I would say the onboarding process for ChargeBee is very slick and impressive. It’s easy to use and doesn’t require a lot of technical knowledge. The ease of integrating it being as simple as adding a link or a few lines of HTML makes getting started really easy. While also providing a feeling of white-glove onboarding with onboarding calls and follow-up calls.
Stripe Billing
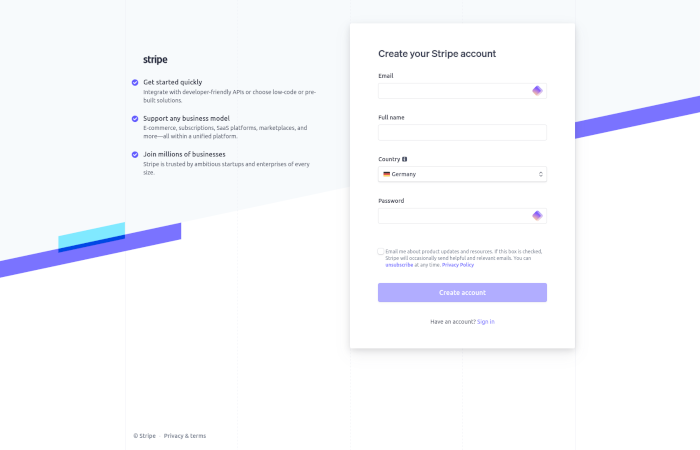
When you first land on the Stripe page they’re main aim is to get you to sign up with a secondary goal of booking a call with their sales team. On every page you go to it’s very easy to see how to get started. It’s also very easy to see how to get in contact with sales if you want to do that.
During the sign-up phase, you’re asked for 4 pieces of information: email, full name, country, and password, as well as be asked to agree to terms and a privacy policy.
Once you’ve submitted, you’re asked to confirm your email. Nothing special or fancy. It’s very much a standard thing where you confirm email before you’re able to do anything further.
After you’ve confirmed your email you’re greeted with a page with two options. One option is to activate receiving payments. And the other option is to explore the features. When you choose to explore you only get to see a small sideshow of the various features that Stripe provides. Every time you choose to get started it’ll send you to activate receiving payments.
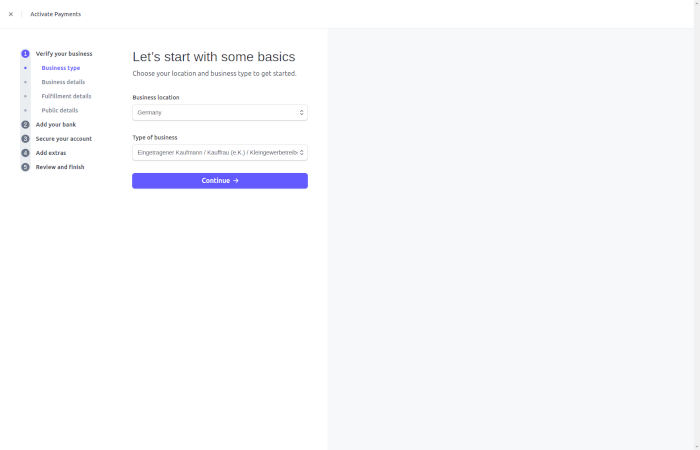
When you activate payments the first thing you need to do is provide the information for your business. What sort of business it is, where it’s based, tax number if it has one, and how long until the customer will receive the product they’ve paid for. The next step is to provide bank details for deposits. Then you have to enable a method for 2-factor authentication. It is not possible to have an active Stripe account without having 2-factor authentication enabled. It then tries to upsell you Stripe Tax.
Once you’ve activated payments you are then able to use the platform. However, you’re unable to make deposits until Stripe has reviewed your information. The review time is between 2-3 days. However, this doesn’t really affect you that much it takes several days for payments to be withdrawable in the first place.
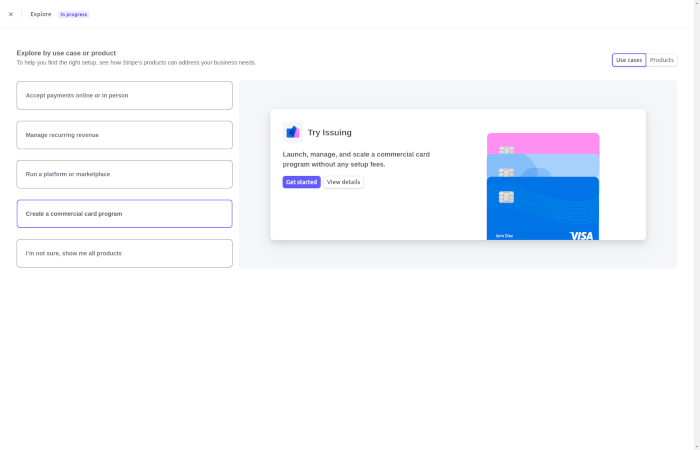
There is no startup guide or onboarding process. You are greeted with 6 options for how to get up and running. The options are:
- Create a checkout page
- Manually charge a customer
- Invoice a customer
- Use a hosted payment UI
- Build a custom payment UI
- Charge customers in person.
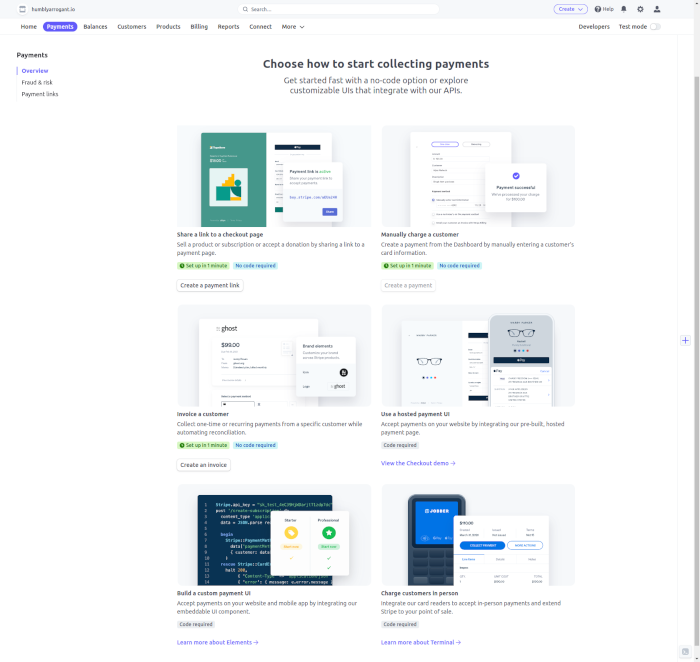
Since Stripe is mainly a payment gateway with many features such as Stripe Billing. The onboarding process isn’t as smooth as others since it’s not as clear how you intend to use it as it is with other products.
Conclusion
The onboard process with both is polished and easy to go through and requires no technical knoweldge. It's possible to get up and running and accepting payments without writing a single line of code.
Steps wise, Stripe Billing is easier, you just sign up and go through the process with Stripe instead of Stripe and then ChargeBee.
However, ChargeBee's onboarding process is just more polished. Since it's aimed at a niche it's able to have a very polished onboarding process. It's able to guide you step by step so that you end up accepting payments for subscriptions without overloading you with multiple options.
If you're wanting to have a nice easy to get to grips with onboarding, ChargeBee is just the better option.